教程 | 无需复杂深度学习算法,基于计算机视觉使用Python和OpenCV计算道路交通
选自hackernoon
机器之心编译
参与:路雪、刘晓坤
本文介绍了不使用复杂的深度学习算法计算道路交通的方法。该方法基于计算机视觉,仅使用 Python 和 OpenCV,在背景提取算法的帮助下,使用简单的移动侦测来完成任务。

今天我们将学习如何在没有复杂深度学习算法的前提下基于计算机视觉计算道路交通。
该教程中,我们仅使用 Python 和 OpenCV,在背景提取算法的帮助下,使用简单的移动侦测来完成任务。
代码地址:https://github.com/creotiv/object_detection_projects/tree/master/opencv_traffic_counting
这里是我们的计划:
- 了解用于前景检测的背景提取算法的主要思想。
- OpenCV 图像过滤器。
- 基于轮廓的目标检测。
- 构建处理管道,用于进一步的数据处理。
视频中展示了结果:
背景提取算法
背景提取有很多不同算法,但是它们的主要思想非常简单。
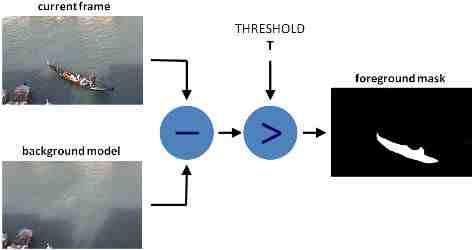
我们来假设你有一个自己房间的视频,该视频的很多帧都没有人/宠物,因此基本上是静态的,我们称之为 background_layer。那么,要想获取视频中移动的物体,我们只需:
foreground_objects = current_frame - background_layer
但是有时候,我们无法获取静态帧,因为光线的变化、某些物体被移动或一直移动等。在这些情况下,我们保存某些帧,尝试找出它们中相同的像素,这些像素就是 background_layer 的一部分。区别通常在于我们获取 background_layer 和用于使选择更加准确的额外过滤的方式。
本教程中,我们将使用 MOG 算法进行背景提取。视频经算法处理后,如下图所示:
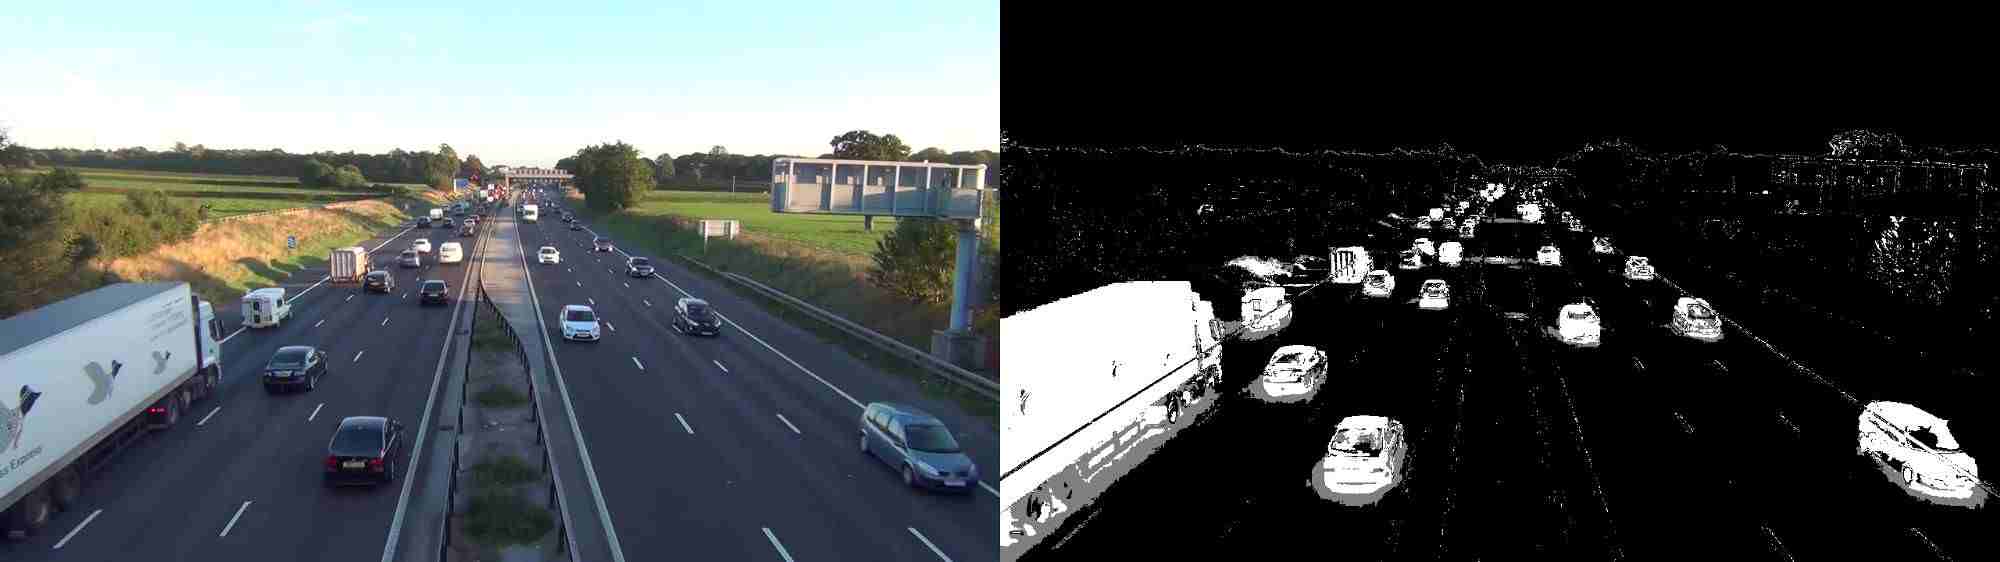
左侧是原始帧,右侧是使用 MOG(带有阴影检测)算法提取的背景
如图所示,前景模板仍存在一些噪声,我们将尝试使用标准过滤技术移除噪声。
代码如下:
import osimport loggingimport logging.handlersimport randomimport numpy as npimport skvideo.ioimport cv2import matplotlib.pyplot as pltimport utils# without this some strange errors happencv2.ocl.setUseOpenCL(False)random.seed(123)# ============================================================================IMAGE_DIR = "./out"VIDEO_SOURCE = "input.mp4"SHAPE = (720, 1280) # HxW# ============================================================================def train_bg_subtractor(inst, cap, num=500):'''BG substractor need process some amount of frames to start giving result'''print ('Training BG Subtractor...')i = 0for frame in cap:inst.apply(frame, None, 0.001)i += 1if i >= num:return capdef main():log = logging.getLogger("main")# creting MOG bg subtractor with 500 frames in cache# and shadow detctionbg_subtractor = cv2.createBackgroundSubtractorMOG2(history=500, detectShadows=True)# Set up image source# You can use also CV2, for some reason it not working for mecap = skvideo.io.vreader(VIDEO_SOURCE)# skipping 500 frames to train bg subtractortrain_bg_subtractor(bg_subtractor, cap, num=500)frame_number = -1for frame in cap:ifnot frame.any():log.error("Frame capture failed, stopping...")breakframe_number += 1utils.save_frame(frame, "./out/frame_%04d.png" % frame_number)fg_mask = bg_subtractor.apply(frame, None, 0.001)utils.save_frame(frame, "./out/fg_mask_%04d.png" % frame_number)# ============================================================================if __name__ == "__main__":log = utils.init_logging()ifnot os.path.exists(IMAGE_DIR):log.debug("Creating image directory `%s`...", IMAGE_DIR)os.makedirs(IMAGE_DIR)main()
过滤
我们这种情况需要这些过滤器:Threshold(http://docs.opencv.org/3.1.0/d7/d4d/tutorial_py_thresholding.html)、Erode、Dilate、Opening 和 Closing(http://docs.opencv.org/3.1.0/d9/d61/tutorial_py_morphological_ops.html)。请打开链接并阅读,查看这些过滤器的工作方式(而不是简单的复制/粘贴)。
那么,现在我们将使用过滤器移除前景模板上的噪声。
首先,我们将使用 Closing 过滤器移除区域中的缝隙,然后使用 Opening 移除 1–2 个像素点,之后使用 Dilate 使物体更加清晰。
def filter_mask(img):kernel = cv2.getStructuringElement(cv2.MORPH_ELLIPSE, (2, 2))# Fill any small holesclosing = cv2.morphologyEx(img, cv2.MORPH_CLOSE, kernel)# Remove noiseopening = cv2.morphologyEx(closing, cv2.MORPH_OPEN, kernel)# Dilate to merge adjacent blobsdilation = cv2.dilate(opening, kernel, iterations=2)# thresholdth = dilation[dilation < 240] = 0return th
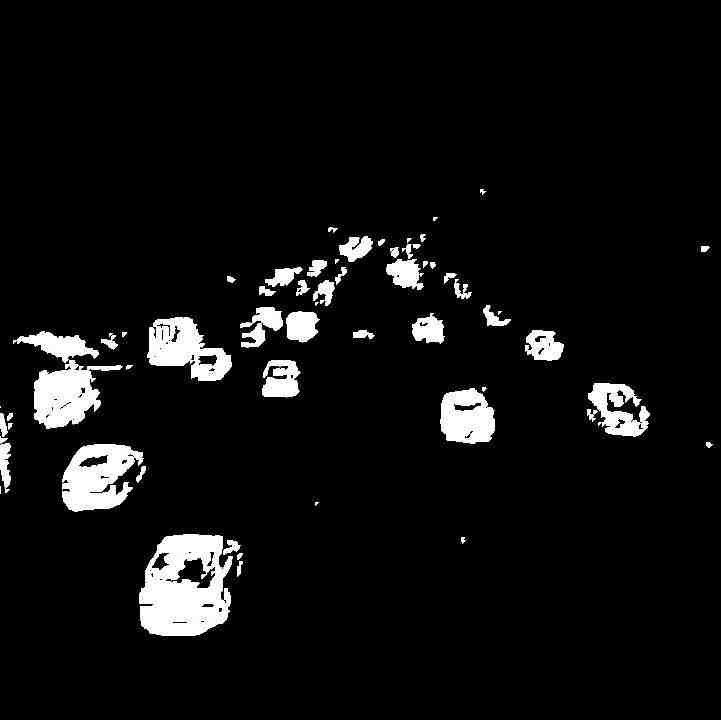
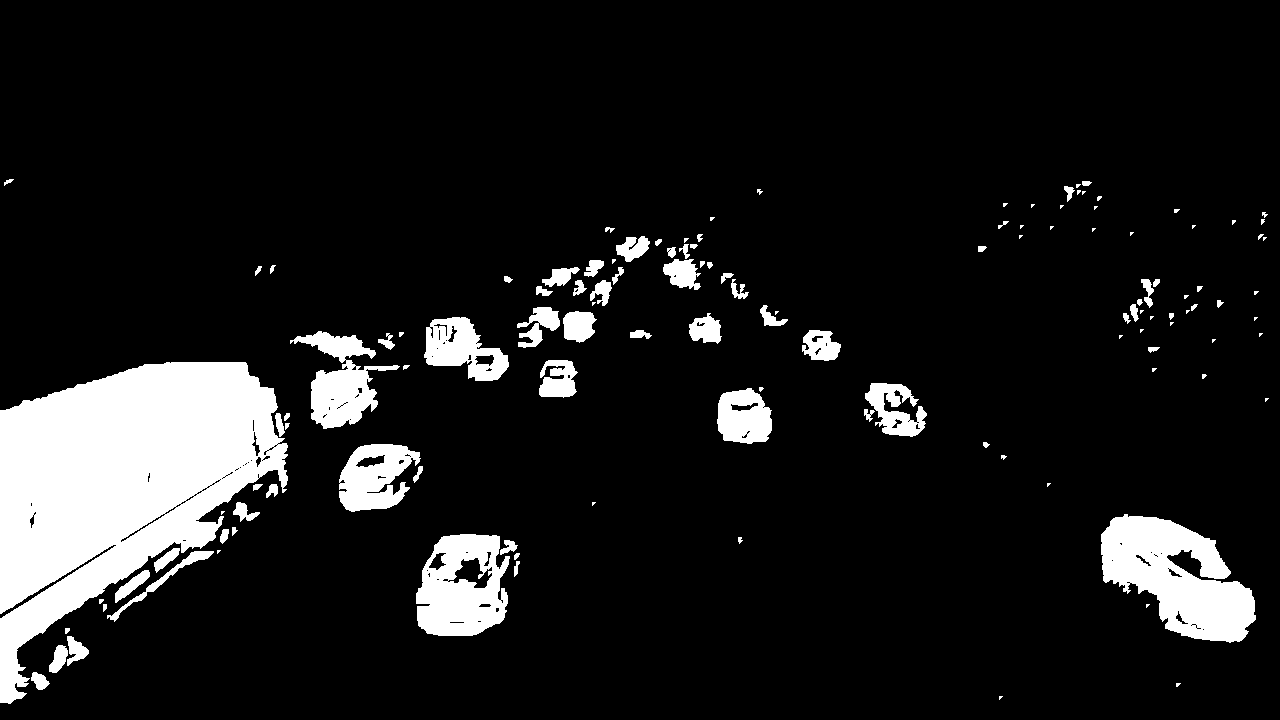
处理后的前景如下图所示:
基于轮廓的目标检测
为达到目的,我们使用带有下列参数的标准 cv2.findContours 方法:
cv2.CV_RETR_EXTERNAL—get only outer contours.
cv2.CV_CHAIN_APPROX_TC89_L1 - use Teh-Chin chain approximation algorithm (faster)
def get_centroid(x, y, w, h):x1 = int(w / 2)y1 = int(h / 2)cx = x + x1cy = y + y1return (cx, cy)def detect_vehicles(fg_mask, min_contour_width=35, min_contour_height=35):matches = []# finding external contoursim, contours, hierarchy = cv2.findContours(fg_mask, cv2.RETR_EXTERNAL, cv2.CHAIN_APPROX_TC89_L1)# filtering by with, heightfor (i, contour) in enumerate(contours):(x, y, w, h) = cv2.boundingRect(contour)contour_valid = (w >= min_contour_width) and (h >= min_contour_height)ifnot contour_valid:continue# getting center of the bounding boxcentroid = get_centroid(x, y, w, h)matches.append(((x, y, w, h), centroid))return matches
在出口区,我们通过高度、宽度添加过滤,并添加质心。
很简单,对吧?
构建处理管道
你必须理解,在机器学习和计算机视觉领域中,没有一种魔术般的算法能够搞定一切,即使我们想象存在这样一种算法,我们仍然无法使用它,因为它在大规模应用时会无效。比如,几年前,Netflix 创办了一个比赛,最佳电影推荐算法奖励 300 万美元。有一支队伍创建了一个最佳算法,但问题是该算法无法大规模应用,因此对该公司没有用处。但是,Netflix 仍然奖励了他们 100 万。:)
那么,现在我们将构建简单的处理管道,该管道不是为了大规模使用,而是为了方便,但原理是一样的。
classPipelineRunner(object):'''Very simple pipline.Just run passed processors in order with passing context from one toanother.You can also set log level for processors.'''def __init__(self, pipeline=None, log_level=logging.DEBUG):self.pipeline = pipeline or []self.context = {}self.log = logging.getLogger(self.__class__.__name__)self.log.setLevel(log_level)self.log_level = log_levelself.set_log_level()def set_context(self, data):self.context = datadef add(self, processor):ifnot isinstance(processor, PipelineProcessor):raiseException('Processor should be an isinstance of PipelineProcessor.')processor.log.setLevel(self.log_level)self.pipeline.append(processor)def remove(self, name):for i, p in enumerate(self.pipeline):if p.__class__.__name__ == name:del self.pipeline[i]returnTruereturnFalsedef set_log_level(self):for p in self.pipeline:p.log.setLevel(self.log_level)def run(self):for p in self.pipeline:self.context = p(self.context)self.log.debug("Frame #%d processed.", self.context['frame_number'])return self.contextclassPipelineProcessor(object):'''Base class for processors.'''def __init__(self):self.log = logging.getLogger(self.__class__.__name__)
由于输入构造函数(input constructor)将使用一串处理器,它们将按顺序运行,每个处理器处理一部分工作。那么,现在我们就来创建一个轮廓检测处理器。
classContourDetection(PipelineProcessor):'''Detecting moving objects.Purpose of this processor is to subtrac background, get moving objectsand detect them with a cv2.findContours method, and then filter off-bywidth and height.bg_subtractor - background subtractor isinstance.min_contour_width - min bounding rectangle width.min_contour_height - min bounding rectangle height.save_image - if True will save detected objects mask to file.image_dir - where to save images(must exist).'''def __init__(self, bg_subtractor, min_contour_width=35, min_contour_height=35, save_image=False, image_dir='images'):super(ContourDetection, self).__init__()self.bg_subtractor = bg_subtractorself.min_contour_width = min_contour_widthself.min_contour_height = min_contour_heightself.save_image = save_imageself.image_dir = image_dirdef filter_mask(self, img, a=None):'''This filters are hand-picked just based on visual tests'''kernel = cv2.getStructuringElement(cv2.MORPH_ELLIPSE, (2, 2))# Fill any small holesclosing = cv2.morphologyEx(img, cv2.MORPH_CLOSE, kernel)# Remove noiseopening = cv2.morphologyEx(closing, cv2.MORPH_OPEN, kernel)# Dilate to merge adjacent blobsdilation = cv2.dilate(opening, kernel, iterations=2)return dilationdef detect_vehicles(self, fg_mask, context):matches = []# finding external contoursim2, contours, hierarchy = cv2.findContours(fg_mask, cv2.RETR_EXTERNAL, cv2.CHAIN_APPROX_TC89_L1)for (i, contour) in enumerate(contours):(x, y, w, h) = cv2.boundingRect(contour)contour_valid = (w >= self.min_contour_width) and (h >= self.min_contour_height)ifnot contour_valid:continuecentroid = utils.get_centroid(x, y, w, h)matches.append(((x, y, w, h), centroid))return matchesdef __call__(self, context):frame = context['frame'].copy()frame_number = context['frame_number']fg_mask = self.bg_subtractor.apply(frame, None, 0.001)# just thresholding valuesfg_mask[fg_mask < 240] = 0fg_mask = self.filter_mask(fg_mask, frame_number)if self.save_image:utils.save_frame(fg_mask, self.image_dir +"/mask_%04d.png" % frame_number, flip=False)context['objects'] = self.detect_vehicles(fg_mask, context)context['fg_mask'] = fg_maskreturn contex
其实就是把背景提取、过滤和检测部分合并起来。
现在,我们来创建一个处理器,其将在不同帧上检测到的物体连接起来并创建路径,还能计算出口区的车辆数量。
'''Counting vehicles that entered in exit zone.Purpose of this class based on detected object and local cache createobjects pathes and count that entered in exit zone defined by exit masks.exit_masks - list of the exit masks.path_size - max number of points in a path.max_dst - max distance between two points.'''def __init__(self, exit_masks=[], path_size=10, max_dst=30, x_weight=1.0, y_weight=1.0):super(VehicleCounter, self).__init__()self.exit_masks = exit_masksself.vehicle_count = 0self.path_size = path_sizeself.pathes = []self.max_dst = max_dstself.x_weight = x_weightself.y_weight = y_weightdef check_exit(self, point):for exit_mask in self.exit_masks:try:if exit_mask[point[1]][point[0]] == 255:returnTrueexcept:returnTruereturnFalsedef __call__(self, context):objects = context['objects']context['exit_masks'] = self.exit_maskscontext['pathes'] = self.pathescontext['vehicle_count'] = self.vehicle_countifnot objects:return contextpoints = np.array(objects)[:, 0:2]points = points.tolist()# add new points if pathes is emptyifnot self.pathes:for match in points:self.pathes.append([match])else:# link new points with old pathes based on minimum distance between# pointsnew_pathes = []for path in self.pathes:_min = 999999_match = Nonefor p in points:if len(path) == 1:# distance from last point to currentd = utils.distance(p[0], path[-1][0])else:# based on 2 prev points predict next point and calculate# distance from predicted next point to currentxn = 2 * path[-1][0][0] - path[-2][0][0]yn = 2 * path[-1][0][1] - path[-2][0][1]d = utils.distance(p[0], (xn, yn),x_weight=self.x_weight,y_weight=self.y_weight)if d < _min:_min = d_match = pif _match and _min <= self.max_dst:points.remove(_match)path.append(_match)new_pathes.append(path)# do not drop path if current frame has no matchesif _match isNone:new_pathes.append(path)self.pathes = new_pathes# add new pathesif len(points):for p in points:# do not add points that already should be countedif self.check_exit(p[1]):continueself.pathes.append([p])# save only last N points in pathfor i, _ in enumerate(self.pathes):self.pathes[i] = self.pathes[i][self.path_size * -1:]# count vehicles and drop counted pathes:new_pathes = []for i, path in enumerate(self.pathes):d = path[-2:]if (# need at list two points to countlen(d) >= 2and# prev point not in exit zonenot self.check_exit(d[0][1]) and# current point in exit zoneself.check_exit(d[1][1]) and# path len is bigger then minself.path_size <= len(path)):self.vehicle_count += 1else:# prevent linking with path that already in exit zoneadd = Truefor p in path:if self.check_exit(p[1]):add = Falsebreakif add:new_pathes.append(path)self.pathes = new_pathescontext['pathes'] = self.pathescontext['objects'] = objectscontext['vehicle_count'] = self.vehicle_countself.log.debug('#VEHICLES FOUND: %s' % self.vehicle_count)return context
该教程有一点复杂,我们一部分一部分地过一遍。
下图中绿色的掩膜是出口区,我们在该区域计算车辆的数量。比如,我们将计算长度大于 3 个点(以移除噪声)的路径,其中第 4 个点就在绿色区域。
我们使用掩膜,因为它对很多操作都有效且比使用向量算法更简单。只需要使用二元和(binary and)运算检查该区域的点就可以了。下图显示了我们的设置方式:
EXIT_PTS = np.array([[[732, 720], [732, 590], [1280, 500], [1280, 720]],[[0, 400], [645, 400], [645, 0], [0, 0]]])base = np.zeros(SHAPE + (3,), dtype='uint8')exit_mask = cv2.fillPoly(base, EXIT_PTS, (255, 255, 255))[:, :, 0]
现在,我们连接路径中的点:
new_pathes = []for path in self.pathes:_min = 999999_match = Nonefor p in points:if len(path) == 1:# distance from last point to currentd = utils.distance(p[0], path[-1][0])else:# based on 2 prev points predict next point and calculate# distance from predicted next point to currentxn = 2 * path[-1][0][0] - path[-2][0][0]yn = 2 * path[-1][0][1] - path[-2][0][1]d = utils.distance(p[0], (xn, yn),x_weight=self.x_weight,y_weight=self.y_weight)if d < _min:_min = d_match = pif _match and _min <= self.max_dst:points.remove(_match)path.append(_match)new_pathes.append(path)# do not drop path if current frame has no matchesif _match isNone:new_pathes.append(path)self.pathes = new_pathes# add new pathesif len(points):for p in points:# do not add points that already should be countedif self.check_exit(p[1]):continueself.pathes.append([p])# save only last N points in pathfor i, _ in enumerate(self.pathes):self.pathes[i] = self.pathes[i][self.path_size * -1:]
在第一帧上,我们只需添加所有点作为新的路径。
接下来,如果 len(path) == 1,对于高速缓存中的每个路径,我们将尝试从新检测到的物体中找出点(质心),这些物体到路径最后一个点的欧几里得距离最短。
如果 len(path) > 1,我们将使用该路径中的最后两个点在同一条线上预测新的点,找出它和当前点之间的最小距离。
将最小距离的点添加至当前路径的末尾,然后将其从列表中移除。
如果还有剩下的点,我们将它们添加为新的路径。
我们还可以限制该路径中点的数量。
# count vehicles and drop counted pathes:new_pathes = []for i, path in enumerate(self.pathes):d = path[-2:]if (# need at list two points to countlen(d) >= 2and# prev point not in exit zonenot self.check_exit(d[0][1]) and# current point in exit zoneself.check_exit(d[1][1]) and# path len is bigger then minself.path_size <= len(path)):self.vehicle_count += 1else:# prevent linking with path that already in exit zoneadd = Truefor p in path:if self.check_exit(p[1]):add = Falsebreakif add:new_pathes.append(path)self.pathes = new_pathescontext['pathes'] = self.pathescontext['objects'] = objectscontext['vehicle_count'] = self.vehicle_countself.log.debug('#VEHICLES FOUND: %s' % self.vehicle_count)return context
现在,我们尝试计算进入出口区的车辆的数量。我们需要观察路径中的最后两个点,并在出口区检查,是否其中靠后的一个在出口区,而靠前的不在,并确保 len(path) 比下限值要大。
之后的部分就是阻止新的点回联至出口区的点。
最后两个处理器是 CSV writer,可创建报告 CSV 文件和可视化文件,用于调试和输出更好的画面。
classCsvWriter(PipelineProcessor):def __init__(self, path, name, start_time=0, fps=15):super(CsvWriter, self).__init__()self.fp = open(os.path.join(path, name), 'w')self.writer = csv.DictWriter(self.fp, fieldnames=['time', 'vehicles'])self.writer.writeheader()self.start_time = start_timeself.fps = fpsself.path = pathself.name = nameself.prev = Nonedef __call__(self, context):frame_number = context['frame_number']count = _count = context['vehicle_count']if self.prev:_count = count - self.prevtime = ((self.start_time + int(frame_number / self.fps)) * 100+ int(100.0 / self.fps) * (frame_number % self.fps))self.writer.writerow({'time': time, 'vehicles': _count})self.prev = countreturn contextclassVisualizer(PipelineProcessor):def __init__(self, save_image=True, image_dir='images'):super(Visualizer, self).__init__()self.save_image = save_imageself.image_dir = image_dirdef check_exit(self, point, exit_masks=[]):for exit_mask in exit_masks:if exit_mask[point[1]][point[0]] == 255:returnTruereturnFalsedef draw_pathes(self, img, pathes):ifnot img.any():returnfor i, path in enumerate(pathes):path = np.array(path)[:, 1].tolist()for point in path:cv2.circle(img, point, 2, CAR_COLOURS[0], -1)cv2.polylines(img, [np.int32(path)], False, CAR_COLOURS[0], 1)return imgdef draw_boxes(self, img, pathes, exit_masks=[]):for (i, match) in enumerate(pathes):contour, centroid = match[-1][:2]if self.check_exit(centroid, exit_masks):continuex, y, w, h = contourcv2.rectangle(img, (x, y), (x + w - 1, y + h - 1),BOUNDING_BOX_COLOUR, 1)cv2.circle(img, centroid, 2, CENTROID_COLOUR, -1)return imgdef draw_ui(self, img, vehicle_count, exit_masks=[]):# this just add green mask with opacity to the imagefor exit_mask in exit_masks:_img = np.zeros(img.shape, img.dtype)_img[:, :] = EXIT_COLORmask = cv2.bitwise_and(_img, _img, mask=exit_mask)cv2.addWeighted(mask, 1, img, 1, 0, img)# drawing top block with countscv2.rectangle(img, (0, 0), (img.shape[1], 50), (0, 0, 0), cv2.FILLED)cv2.putText(img, ("Vehicles passed: {total} ".format(total=vehicle_count)), (30, 30),cv2.FONT_HERSHEY_SIMPLEX, 0.7, (255, 255, 255), 1)return imgdef __call__(self, context):frame = context['frame'].copy()frame_number = context['frame_number']pathes = context['pathes']exit_masks = context['exit_masks']vehicle_count = context['vehicle_count']frame = self.draw_ui(frame, vehicle_count, exit_masks)frame = self.draw_pathes(frame, pathes)frame = self.draw_boxes(frame, pathes, exit_masks)utils.save_frame(frame, self.image_dir +"/processed_%04d.png" % frame_number)return context
CSV writer 按时间保存数据,因为我们需要用它做进一步的分析。因此我使用下列公式向 unix 时间戳添加额外的帧计时:
time = ((self.start_time + int(frame_number / self.fps)) * 100
+ int(100.0 / self.fps) * (frame_number % self.fps))
在 start time=1 000 000 000 和 fps=10 的情况下,结果如下:
frame 1 = 1 000 000 000 010
frame 1 = 1 000 000 000 020
…
获取完整的 csv 报告后,你可以随意聚合这些数据。
该项目的完整代码地址:https://github.com/creotiv/object_detection_projects/tree/master/opencv_traffic_counting
结论
所以,这并不像人们想象的那么难。
但是,如果你运行该脚本,你会发现该解决方案并不完美,它存在一个问题——背景物体重叠,而且它还无法按类型进行车辆分类(实分析时你肯定需要)。但是,该方法拥有好的摄像头位置(道路上方),能够提供相当不错的准确率。这告诉我们即使简单的小算法用好了也能取得不错的结果。
那么我们要怎么做才能解决当前的问题呢?
一种方式是添加额外的过滤,使物体分离,以进行更好的检测。另一种方式是使用更复杂的算法,比如深度卷积网络。

原文地址:https://hackernoon.com/tutorial-making-road-traffic-counting-app-based-on-computer-vision-and-opencv-166937911660
本文为机器之心编译,转载请联系本公众号获得授权。
✄------------------------------------------------
加入机器之心(全职记者/实习生):[email protected]
投稿或寻求报道:[email protected]
广告&商务合作:[email protected]
阅读原文 最新评论
推荐文章
作者最新文章
你可能感兴趣的文章
Copyright Disclaimer: The copyright of contents (including texts, images, videos and audios) posted above belong to the User who shared or the third-party website which the User shared from. If you found your copyright have been infringed, please send a DMCA takedown notice to [email protected]. For more detail of the source, please click on the button "Read Original Post" below. For other communications, please send to [email protected].
版权声明:以上内容为用户推荐收藏至CareerEngine平台,其内容(含文字、图片、视频、音频等)及知识版权均属用户或用户转发自的第三方网站,如涉嫌侵权,请通知[email protected]进行信息删除。如需查看信息来源,请点击“查看原文”。如需洽谈其它事宜,请联系[email protected]。
版权声明:以上内容为用户推荐收藏至CareerEngine平台,其内容(含文字、图片、视频、音频等)及知识版权均属用户或用户转发自的第三方网站,如涉嫌侵权,请通知[email protected]进行信息删除。如需查看信息来源,请点击“查看原文”。如需洽谈其它事宜,请联系[email protected]。